|
|
|
I won't go into how to create an animation in Poser, you will either have to know how to do this or find another tutorial explaining this. This tutorial will assume you have some knowledge on how Poser works. This tutorial will explain how to get the files we need to import the animation into Bryce.
|
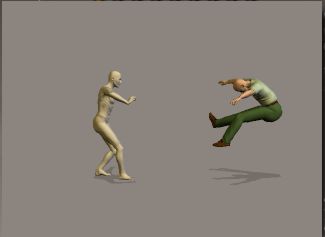
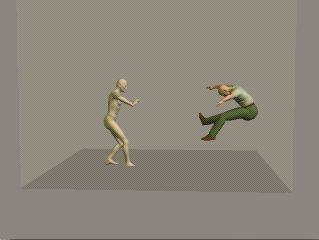
Step 1 : Open Poser and create the animation you want. This can be a single character or multiple characters, with or without props. For this example I created a simple fight scene with 2 characters. (NOTE: I was not worried about timing or anything like that, I just wished a simple animation to get some movement and interaction). For most cases you will want to animate your characters without them moving in the X,Y or Z direction because you will be doing the actual moving in Bryce, in other words all you want are the actions of the character but not the movement within the world (ex. A walking animation would require just the walk without a walk path so the character would be walking in place). In this case I could have done this in 1 of 2 ways. 1> Animate each character separately without them moving in the world and just going through the motions. 2> Animate them together and actually move in the world space. I chose option 2 for this example which is the more difficult as we will see below. |
|
|---|---|
|
Step 2 : Now that we have our animation we have to prepare for export from Poser into Bryce. Go to props and select box. Scale it until it encompasses the whole scene. This is important, make sure it stays the same size throughout the animation , otherwise you will have a problem correcting the size when you import it into Bryce. Placement isn't as important as we will be moving the Poser object anyway once they are in Bryce. The reason we do this is because the way Bryce imports objects it scales them to a unity size. We create the box to give Bryce something that will always be the same size when it imports, thus everything within the box retains it's original proportions. If didn't do this then each frame of the object would be different sizes and it would be very hard to get all the scales correct again. |
|
|
Step 3 : Go to File/export and select Wavefront OBJ Select Multi-frame export and what frames you wish In this case it's a 30 frames with a frame rate of 30/sec. |
|
|
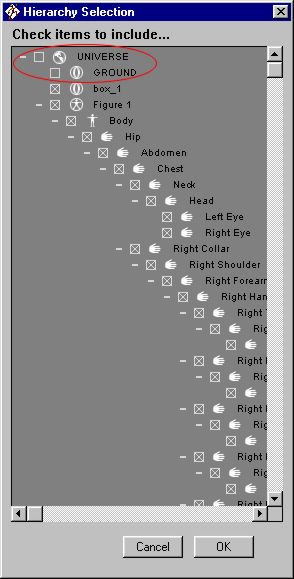
Step 4 : Unselect Universe and Ground making sure you include the box and all figures you wish to export. This will export each frame as an .obj file with the name [file name]_#.obj Where file name is the name you saved the files as and # is the frame number starting at 0. So for my animation they are numbered 0-29. |
|
Continue to Part 2 of the Poser animation to Bryce Tutorial
![]()
You are
visitor 


 to this page