|
|
|
|
Step 1 : Now create your Bryce scene for your Poser characters to play in. Perhaps you have already done this in preparation for the animation. You can have bryce stuff animated now as well. Be sure you go to the animation setup menu and set the frame rate to the same as your Poser animation. This will make timing things easier. |
|
|---|---|
|
Step 2 : If you don't need to adjust any materials for your Poser object then skip this step, otherwise continue. Import one of your Poser .obj files (doesn't matter which frame yet). Delete the box and perhaps ungroup the Poser object group to make selecting meshes easier. Adjust any materials you need to, for each material adjusted create a primitive (I used a cube) and set it's attributes to hidden. You will use this to hold the adjusted materials so that you can re-apply it to each frame of objects. Select the mesh with the adjusted material, go to edit menu and select copy material, then select the primitive and paste material. You may want to give the primitive a name so it'll be easier to find later, use something descriptive of either the material or mesh it goes to. If you need to adjust a material that several meshes use then you only need 1 primitive (not 1 for each mesh). For example if I adjusted the skin I would just need 1 primitive to use for the chest hands, etc. But I would need another if the eyes required another kind of material or adjustment (which most Poser imports do require). You will have to follow this step for each Poser animation you wish to import and have to adjust the material. If you wish to animate a material for you Poser object then create a primitive and copy the beginning material to it. Mover your timer scrubber and change the material on the primitive that you wish it to change to (or animate in whatever way you want). Each time we advance the frame you will get your animate material and paste it to the mesh. |
|
|
Step 3 : If you followed step 2 above and used an object file different than frame 0 then delete your Poser objects. Otherwise if you used frame 0 and ungrouped it you may want to group it again to make moving and scaling easier. If you had to delete your objects then import object frame 0, delete the box and re-apply the adjusted materials by copying and pasting it back to the appropriate mesh. Move your group to where you want it and scale if necessary. Be sure to write both the position and the percent that you scaled it so that you can apply the same changes to each frame's group. |
|
|
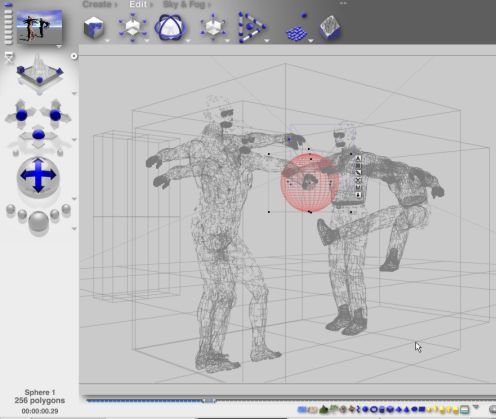
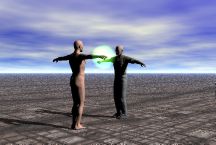
Step 4 : Say you want to have Bryce objects interact with your Poser characters, now is a good time to get the basics of the animation. Here I decided I wanted the figure to have a glowing sphere around his hand as if he had some kind of "power". I created a sphere and applied "green lit" material to it. Making sure the time scrubber was set to frame 0 I aligned the sphere to his right hand. Import Poser object frame 29 and moved the scrubber to frame 29 and aligned the sphere. To refine it I import object frame 14 (½ the total animation (not pictured here)) moving the scrubber to frame 14 I align the sphere again, now this gives a pretty good curved path that should follow the movement of the hand fairly close. We can make fine adjustments as we render. Now that we have that set up we can deleted object frame 14 & 29 leaving frame 0 again. Make sure your time scrubber is set back to frame 0. On to the rendering. |
|
|
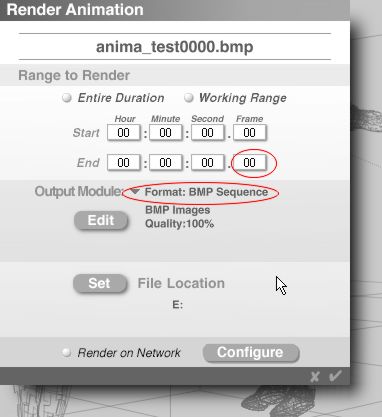
Step 5 : Go to File/document setup and set your render size. Go to File menu and select render animation. Set output module to BMP sequence and set your file location and name. Now under Range to Render enter 0 for the End frame, click the check mark. This will render only frame 0 but will will get files [file name]####.bmp with #### equaling the frame we are working on. This will allow it to be easier to put the bitmaps together to make your movie. If you are going to need masks for your animation, select mask render, go back to render animation, change the name and input end frame 0 then click check mark. If you need masks you'll have to change the file name each frame but the numbers at the end will automatically be appended to the end. NOTE: don't forget to change the render option back and forth between normal and mask. |
|
|
Step 6 : Move time scrubber to frame 1 (I do this first so I have a reference to what frame I'm working on now and can import the appropriate files). Delete object frame 0 and import object frame 1. Delete the box surrounding it, position and scale if need and reapply the adjusted materials by copying and pasting from your primitive objects you created for this purpose. |
|
|
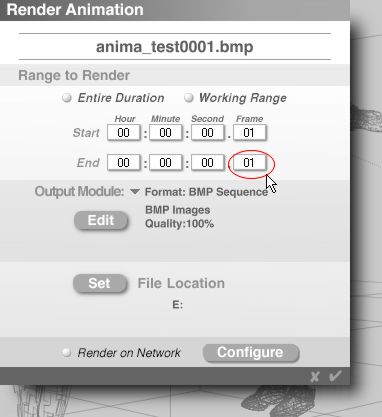
Step 7 : Once the object is setup again go to file/render animation. You will notice that the name of the file automatically advances the number. Input 01 for the end frame and click the check mark. |
|
|
Step 8 : Repeat steps 6 & 7 until the whole animation is complete. Now you have the bitmap files needed to put together into a movie using something like Premiere, Corel Photopaint or any other program that can do this. |
|
|
Sample .avi (282 kb) |
|
Continue to Animation Paths Tutorial
![]()
![]()
You are
visitor 

 to this page